KVM : Virtualisation Out of the Box
I have been looking forward for a replacement of Vitualbox OSE . This thing started our quest for finding a Visualization application to fulfill the needs with an easy-to-use procedure. I found KVM in Add/remove while i was looking for something alike YaVM - Yet another Virtual Machine (An application developed for openSUSE in 2006 to serve as basic virtual machine that comes with the os preinstalled). Xen , the geeky Virtual machine by SUSE linux enterprise is a virtualisation powerhouse. While Xen offers quite complex procedure requiring you to boot a patched Xen kernel to create and run a Virtual machine - KVM is a loadable module which runs with the OS's default kernel module. The only thing it requires is that your processor should have the architecture to support virtualisation .
For this type:
kvm
in the terminal and see the result:
QEMU PC emulator version 0.9.1 (kvm-84), Copyright (c) 2003-2008 Fabrice Bellard
usage: qemu [options] [disk_image]
If you see the above message, then you should be smiling as you are green to go for virtualisation with your hardware.
But if your CPU does not, in fact support Hardware virutalization, you will get output such as the following:
$ kvm
Could not initialize KVM, will disable KVM support
Ubuntu does not support running KVM without hardware acceleration. Sorry.
So lets start our work with Virtualisation weapons at hand. First, head on over to the KVM HOME PAGE :
http://www.linux-kvm.org/page/Main_Page
Best feature of KVM is that it is part of the OS and is not dependent upon a 3rd party vendor . Also, it’s very easy to maintain as you update your system, and load new kernel revisions, as the module will not break like VirtualBox and VMware solutions would. Also, it’s far less problematic to manage than Xen, which is entirely unsuitable for a desktop system IMO :P . KVM really is more of a direct competitor to Xen than to a workstation solution like VirtualBox or VMware workstation, and has some very powerful features, I will never tap into here on my home system. By design however, it’s far less intrusive on a standard Linux desktop than Xen.
Now we have our kernel module working properly and rest everything in place so must get back to bussiness :D. I will use Lubuntu for the testing purpose coz its my personnel favourite and it very light too.
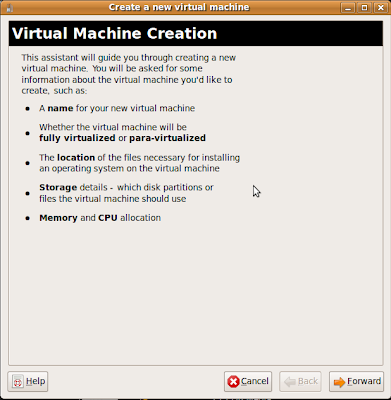
Follow these steps to set up your virtual Machine :-
Step I : Launch :- Goto Applications>System tools and start KVM . Then choose the virtualisaton method to full virtualisation if your processor supports that feature.

Step II :Installation Method :- Now choose the media from which the OS is to be installed to the machine . Also chose the OS type and its Variant .

Step III : Installation Media : Select he ISO image location (whether from External drive or already present image from HDD) .

Step IV :Allocating Space:- Choose the disk space you wnt to allocate to the machine's Virtual Hard drive. Allocate space wisely for stability issues .Then select to allocate the whole virtual hard disk to the machine .

Note: If you dont allocate the whole virtual hdd to the machine , then the machine will allocate space for itself while it is running and if the space in that partition goes out , the the data in the virtual machine is likely to get corrupted. You can allocate additional space like network drives etc to your virtual drive.
Step V : Memory & CPU allocation :- Allocate RAM for your machine which it wil be able to utilize to max. You have to allocate RAM for peak run and startup diffrently. Do it generously for proper running of he host and virtual machine . Eg: i have 2 gb RAM and i allocated 750 mb to the machine to max and for start-up , i gave it 512 mb. You can change the se settings in the hardware section og the gui while running the machine.

Step VI : Finishing Job :- Check your preferences and Click finish & let the magic happen. The installation os a virtual OS is totally same as installing a regular OS. So, now we are done with it .


Obviously , KVM is much more capable than we discussed just now. We were just able to do the basics, rest you can try on your own after installing the application.

Happy Virtualistion !!!
For this type:
kvm
in the terminal and see the result:
QEMU PC emulator version 0.9.1 (kvm-84), Copyright (c) 2003-2008 Fabrice Bellard
usage: qemu [options] [disk_image]
If you see the above message, then you should be smiling as you are green to go for virtualisation with your hardware.
But if your CPU does not, in fact support Hardware virutalization, you will get output such as the following:
$ kvm
Could not initialize KVM, will disable KVM support
Ubuntu does not support running KVM without hardware acceleration. Sorry.
So lets start our work with Virtualisation weapons at hand. First, head on over to the KVM HOME PAGE :
http://www.linux-kvm.org/page/Main_Page
Best feature of KVM is that it is part of the OS and is not dependent upon a 3rd party vendor . Also, it’s very easy to maintain as you update your system, and load new kernel revisions, as the module will not break like VirtualBox and VMware solutions would. Also, it’s far less problematic to manage than Xen, which is entirely unsuitable for a desktop system IMO :P . KVM really is more of a direct competitor to Xen than to a workstation solution like VirtualBox or VMware workstation, and has some very powerful features, I will never tap into here on my home system. By design however, it’s far less intrusive on a standard Linux desktop than Xen.
Now we have our kernel module working properly and rest everything in place so must get back to bussiness :D. I will use Lubuntu for the testing purpose coz its my personnel favourite and it very light too.
Follow these steps to set up your virtual Machine :-
Step I : Launch :- Goto Applications>System tools and start KVM . Then choose the virtualisaton method to full virtualisation if your processor supports that feature.


Step II :Installation Method :- Now choose the media from which the OS is to be installed to the machine . Also chose the OS type and its Variant .

Step III : Installation Media : Select he ISO image location (whether from External drive or already present image from HDD) .

Step IV :Allocating Space:- Choose the disk space you wnt to allocate to the machine's Virtual Hard drive. Allocate space wisely for stability issues .Then select to allocate the whole virtual hard disk to the machine .

Note: If you dont allocate the whole virtual hdd to the machine , then the machine will allocate space for itself while it is running and if the space in that partition goes out , the the data in the virtual machine is likely to get corrupted. You can allocate additional space like network drives etc to your virtual drive.
Step V : Memory & CPU allocation :- Allocate RAM for your machine which it wil be able to utilize to max. You have to allocate RAM for peak run and startup diffrently. Do it generously for proper running of he host and virtual machine . Eg: i have 2 gb RAM and i allocated 750 mb to the machine to max and for start-up , i gave it 512 mb. You can change the se settings in the hardware section og the gui while running the machine.

Step VI : Finishing Job :- Check your preferences and Click finish & let the magic happen. The installation os a virtual OS is totally same as installing a regular OS. So, now we are done with it .


Obviously , KVM is much more capable than we discussed just now. We were just able to do the basics, rest you can try on your own after installing the application.

Happy Virtualistion !!!

Comment Form under post in blogger/blogspot